Originally authored 8/17/2012
As many of you know, I’m a big fan of machetes and other choppers, and many of them come without sheaths. Custom leather or kydex can be had from many skilled craftspeople, but when you have as many inexpensive choppers as I do it just doesn’t make good financial sense to have them made for more than a select few of them! My solution to that common problem, was to turn to a material that most of us have in abundance–hobo leather! And by hobo leather I mean cardboard! 
Now, a simple fold-over sleeve is something that most of us have likely done before for machete transport or mailing a sheathless knife (like a Busse) out for custom work. However, I wanted something that was a quick fix, but MORE than a temporary one. I’ve been using this method for a few years now, but never bothered (or remembered!  ) to take photos of the process! I just thinned the edge on my Friedrich Dick “Italien Messer” cleaver and no longer trusted the plastic sleeve that it came in, and I
Step 1: Get a nice flat piece of cardboard with as few creases as possible. Make sure it’s wider than the blade by at least a few inches.
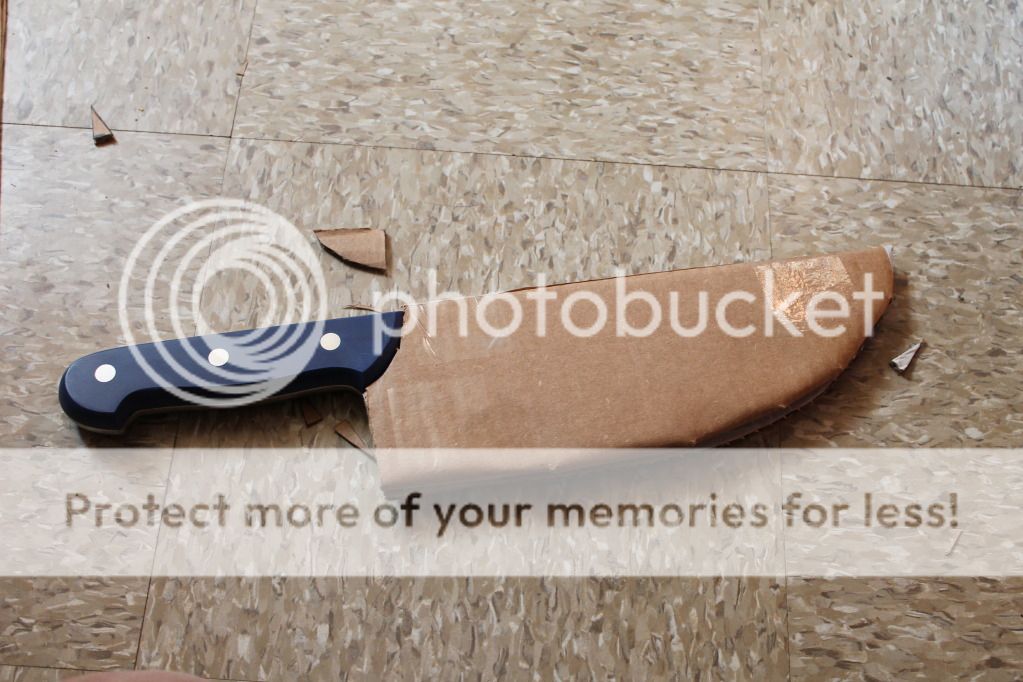
Step 2: Trace the outline of the blade on the cardboard and cut it out. You can use scissors, but they can cause bends or wrinkles in the cardboard so I used a hawkbill pruner.


Step 3: Lay the piece you just cut out on a free space of the cardboard and trace it. This is easier than tracing the blade itself again. Then draw a border around the tracing about 1″ wide. Wider is better than narrower–you can see that I started off a little narrow and had to correct myself. Then cut out this wider shape.


Step 4: Now it’s time to start folding the larger form around the blade. Since the spine on the cleaver is straight, I started there. Then I drew “wedges” along the edge side of the border and cut them out to form tabs that could fold around the edge. If you experience any bad overlap when folding the tabs over, just trim the excess off with some scissors.


Step 5: After adjusting the fit of the tabs, fold them all around the blade and place the smaller cardboard cutout on top of it. I like to hold down on it with my knee after I get all the tabs in nicely because it leaves my hands free for the next part!
Step 6: Now it’s time for tape! I like to use packing tape because it leaves a glossy waterproof surface and doesn’t gum up with age/heat like duct tape does. Stick a few strips on either side of the sheath to pin the two halves together.
Step 7: Now finish taping! I attach strips of tape to the “small” panel of the sheath and crush the edge of the cardboard with my thumb while stretching the tape taught over the edge before affixing it to the other side. That snugs things up nice and firm. Do this along all of the edges, then cover any bare patches on the center regions of the panels for a little extra water resistance. Now you’re done! You can freely remove the blade at this point and the sheath will hold its shape, and with just the right amount of gentle tension. 

I find these hold up very decently under repeated use and just a little care. They make a very good sheath for stuffing in your pack. Maybe one of these days I’ll figure out a good way to attach a durable belt loop or sling to it. They do the job just fine as is for now, though!